DIY Wind chimes are beautiful and have a great significance in balcony decorations. These decorative ornaments can bring visual and musical beauty in our homes. However, these melodious décor pieces are quite expensive. You can make the customized and beautiful wind chimes at your home with the help of a plastic bottle! It is also a beautiful bird wall hanging which is beautiful, colourful and eye pleasing!

Want to get a beautifully customized wind chime for your home? Here is all you need to do!
Things You Need To Make A DIY Wind Chime
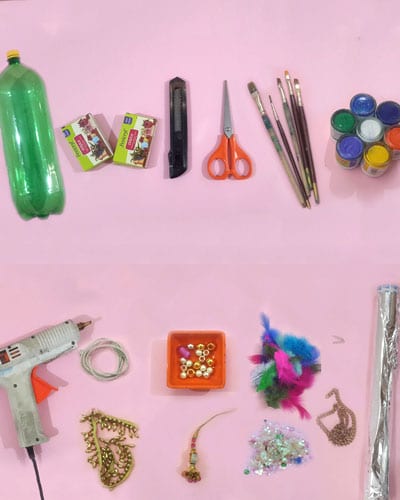
- Plastic bottle
- Shilpkar clay
- Cutter
- Scissors
- Colours and brushes
- Glue gun
- Thread
- Beads
- Artificial feathers
- Iron nails
- Aluminium foil
- Decorative lace
- Decorative hangings
- Sequences
- Golden chain
Steps To Make A DIY Wind Chime
Step 1- Prepare roof the plastic bottle
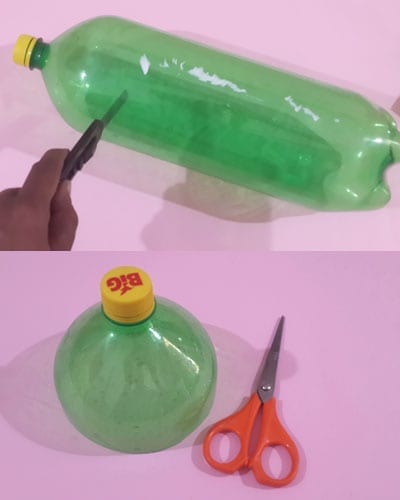
Let’s start with making the roof of the wind chime. We will make this roof with the help of a plastic bottle. Take the plastic bottle and with the help of a cutter, cut the bottle from the upper-middle part. You will get the top of the bottle. Now, get some shilpkar clay and soften it with your hands. Press and bind it to make it soft and usable. Roll the clay like dough and with the help of the bottle, roll prepare long sheet from the clay.
Step 2- Design the bottle with clay

Use the cap of the bottle to cut out small circles of clay sheet. Cut the clay just like we cut the cookie dough! Get multiple circles from the clay dough and stick these circles on the bottle evenly. Cover the entire bottle head with such circles. Now paint the clay circles with different colours. Apply double coats to get a smooth and thicker paint layer.
Take the dark blue shade and paint the entire bottle with this shade. Apply double coats of colour on the bottle to get a smoother look. Also, paint the top of the bottle and make a hole on the top. Once the bottle and paint get dry, you will get a beautiful bottle which has colourful circles on it! This looks stunning.
Step 3- Decorate the bottle

Once we have finished colouring, it’s time to decorate the bottle with beads and sequences. Stick the beautiful sequences on the bottle in a random fashion with the help of glue. Only stick the sequences on the dark blue portion of the bottle and not on the circles. This will give a glittering and glorious look to the bottle!
Step 4- Prepare the artificial bird
Below the bottle roof, we will hand a beautiful DIY bird to enhance the look of the wind chime. For making this bird, get the aluminium foil. Aluminium foil is easy to bend and fold and thus, we can get a beautiful bird shape out of this foil. Make the front of the bird while folding and preparing a trash of aluminum foil. Also, use the foil to make a head and neck while join a long thin foil wrap to make a perfect tail finish. Shape the foil in a bird’s body! And here’s a cool bird ready!
Step 5- Shape the bird and make it ready to hang

This is a rough shape of the bird and thus, for a perfect bird shape, we will need to wrap it with clay. Smoothen some clay and wrap it on the foil bird to make it attain a perfect bird shape. Stick the clay layers thoroughly and make a hole in the centre of the bird.
We need to hang this bird in a wind chime and thus, we will make the vertical hole in the bird. With the help of an aluminium wire, make a hole in the bird.
Step 6- Prepare the feathers of bird
This is a very interesting part where we will make the artificial feathers of this bird. Roll some clay in a thin strip and stick this thinly rolled clay on the body of the bird. Make a perfect shape of a feather on both the sides. Now use a toothpick to make the flares and design on the feather. This will make the birds feathers look extremely realistic and beautiful!
The bird now needs a beak and thus, make a beak shaped clay formation and stick it on the bird’s mouth.
Step 7- Colour and decorate the bird and add feathers
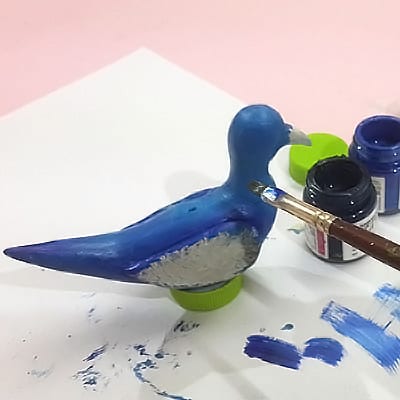
It’s now time to give some beautiful and natural colours to the bird. Start with the blue shade and paint the wings with different colours. You can also apply shades of yellow, pink, and blue, orange, brown and so on for making the bird look natural and stunning! Also, colour the eyes and beak of the bird.
Now, use the beautiful and colourful artificial feathers to make the bird look awesome! Paste the feathers on the back of the bird using glue and let it stick perfectly.
Step 8- Make the hanging with beads and decorative materials

Take a long thread and add the decorative hanging in the bottom of the thread. One by one, add the golden beads and pearls in the thread. Also, add the bird now and again stuff the thread with beautiful beads. Make a beautiful chain of golden, colourful and decorative beads on the bird.
Now, fix the golden chain in the bottle cap and stick it with the help of a glue gun. Close the bottle and paste the decorative golden lace on the end of the bottle. You can use the decorative lace with small bells which will make a melodious sound! Let the lace stick well to the bottle.
Fix the bird and hanging with the golden chain through the cap of the bottle and hand this beautiful diy wind chime in your home!

Here is a beautiful and stylish wind chime with a stunning hanging which will brighten up your diy home décor as never before!
You can use this amazing wind chime as a balcony hanging or traditional wall hanging during festivals. Add the lace of bells in this wind chime to make it sound melodious while you sit on your balcony enjoying the cool breezes of wind!
Happy crafting!
Related Posts