We all like to put a nameplate outside our home. It feels great pride to have your name carved on a nameplate and hang it outside your home. These days different nameplates with different styles and designs are available in the market. There are several options to choose from and you can even get it delivered from online shopping. The important thing is when you choose your home yourself, design and decor the home as per your needs and creativity then why opt to buy a nameplate outside. The DIY homemade nameplate will be the best idea for your home.

Here we bring you a beautiful DIY Homemade Nameplate which you can make easily and display your creativity. It is unique and looks amazing which will have an essence of the brick effect and can perfectly blend with home.
Have a look at the step by step video tutorial for making this DIY Homemade Nameplate!
Things Needed

- Cardboard
- Pencil
- Cutter
- Adhesive
- Paintbrush
- Bowl
- Scissors
- Colors
- Decorative flowers
- Clay
- Satin Ribbon
- Water
- Glue gun & stick
- Thick cardboard
- Tissue papers
- paper
Procedure To Make DIY Homemade Nameplate
Step 1-

- Take a thin cardboard and draw the pattern as shown.
- Cut along the pattern to get the base shape for making the nameplate.
- Cut the cardboard into small pieces. We will need several such small pieces.
- Paste the small cardboard pieces on the base of the nameplate cardboard.
- This will give the look of a nameplate with brick effect.
Step 2-
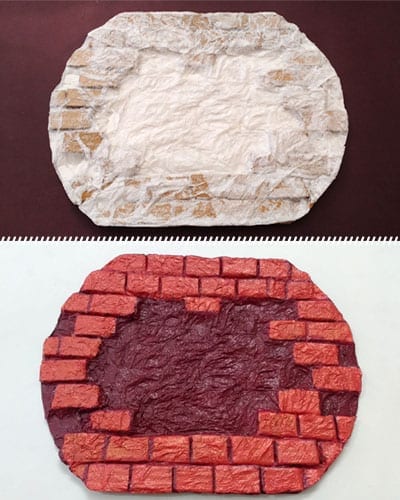
- Take a tissue paper and crumble it in your hands.
- Apply glue to it and stick the tissue paper on the cardboard. Cut the extra tissue which is present outside the border of the nameplate frame.
- Allow it to dry for some time.
- Once it is completely dry, apply the brick color on the tissue paper.
- Be careful to apply the brick color only in the areas where you have pasted the small cardboards to give it a brick look.
- Remaining area paint using a darker shade preferably maroon color.
- Color the outlines with the same color to complete its look.
Step 3-
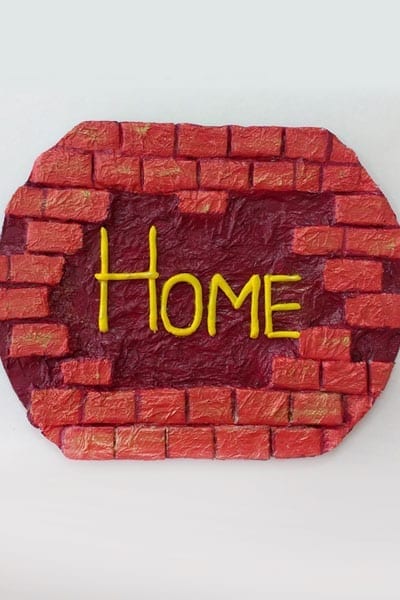
- Take a color paper similar to the color of the brick.
- Paste the color paper on the backside of the nameplate.
- In the center of the nameplate, we will use clay to make some designs.
- Take some clay balls and make rolls out of it.
- Stick the rolls to write the word HOME on your nameplate.
- Take water and wet the clay HOME slightly with it.
- Use a yellow color paint to paint the alphabets.
- Take golden color paint and highlight the bricks and the alphabets for a metallic finish.
Step 4-

- To hang the nameplate outside, we will make it as a wall hanging.
- Take a satin ribbon and apply glue on the backside of the nameplate.
- Paste the satin ribbon on the backside.
- To decorate, paste the artificial decorative flowers at one corner of the wall hanging.
Your nameplate is now ready to use.
Conclusion
This beautiful brick wall hanging DIY Homemade Nameplate looks really elegant when hanged outside your home. You can also use your creativity and write your name on it. The craft looks very simple yet elegant and it is easy to make as well as elevates the show off your house. Try making this easy DIY Homemade Nameplate at home and share your inputs.
Happy Crafting!!
Related Posts