We all love to have some lucky things in our house which also enhances the home décor! People bring home some good luck plants, idols of gods and goddesses, lucky charm ornaments to bring good luck in homes. One of the best good luck charms are the turtles. Tortoises are the symbol of patience, longevity and potential. In this handmade craft tutorial we are going to make a lucky Turtle Craft as a home decoration from recycled material.
Why spend more amounts on shopping the good luck turtles when you can prepare an interesting and natural looking turtle at your home? This is such an interesting DIY art which you can try along with your kids and enjoy your crafting period together!
Here is a simple and easy tutorial for making a good luck turtle at home!
For those who like to watch the craft being made, here is a detailed craft video tutorial –
If you like to read the step by step tutorial with image guides then here is a tutorial for you.
Things You Need To Make A DIY Lucky Turtle Charm
- Plastic ball
- Aluminium foil
- Paint brushes
- Colours
- Shilpkar clay
- Cutter
- Glue gun
- Decorative artificial grass and shells
Steps To Make A DIY Lucky Turtle Charm Craft
Step 1- Prepare the turtle body
We will be using a plastic ball to make the body of the turtle. Get amid sized plastic ball and cut it into 2 halves. Use a cutter and safely cut the ball. To give it a steady base, stick a square piece of cardboard on the bottom of the ball. Now, let’s make the legs of the tortoise using aluminium foil.
Make 4 thick and small legs of the turtle while rolling and pressing the aluminium foil. Give it a shape of the legs. Now attach these legs to the ball. With the help of glue gun, stick 2 legs in front while 2 in the back of the half ball.
Step 2- Make the legs of the turtle
To get natural looking legs, get some shilpkar clay and soften it with both your hands. Make small pieces and soften it until it gets extremely smooth and easily applicable. Now cover the legs of the turtle using this clay. Broaden the clay in your hands, stick it to the aluminium foil made legs and press it for more natural look.
Make the legs broad and thick from the bottom and apply some marks on the legs using a cutter. Make the fingers and lines on the legs for a natural skin look!
Step 3- Prepare the head of the turtle
Again, for preparing the head of the turtle use aluminium foil. Bend the foil and give it the shape of turtle’s head. Also cover this head with clay. Smoothen the clay, apply it on the head of the turtle and use the cutter to give it a natural shape. Polish the clay, make the mouth opening of the turtle with cutter.
Also carve the eyes, head design, lines on the face of the turtle. When this is prepared, keep it aside.
Step 4- Decorate the body
The turtles have half circle style crust on their bodies. For this, we will need some clay circles. Get some clay and soften it. Prepare thin sheets of clay and cut out small circles form this sheet. You can use bottle tops to cut the circles. Stick these circles on the body of the turtle that is, on the plastic ball.
Layer these same sized circles in a liner way on the body. Top another layer of circles above the bottom layer and keep sticking the circles until you completely cover the half ball.
Step 5- Complete the body
Once all the circles are attached, you need to now stick the head of the turtle in front. Apply thin layers of clay on the neck of the turtle and while using glue gun, stick the head in the front. Stick the head efficiently and cover the junction using a clay roll. Prepare a thin clay role and paste it on the neck to give the head a natural look!
Step 6- Frame the turtle and colour it.
Once all the parts of the turtle are joined, frame the turtle’s body with a clay string. Roll the clay and make a long rope like roll and stick it on the ball. This ill hide the half circles and will give the body a perfectly natural look! Give is a bouncy and wavy look wile lightly pressing an iron nail on it.
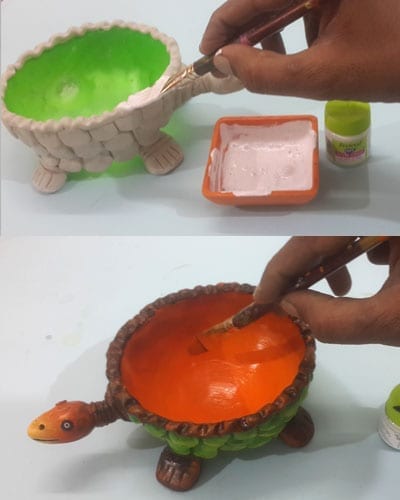
Now, it’s time to colour the turtle. Start with applying white colour all over the turtle. Now get green shade and apply it on the turtle. Use light and dark shades of green to give it a perfectly natural and smooth look. Cover the top and base of the turtle and use shades like yellow, red, orange, green and more to make it look interesting. Now colour the legs of the turtle in brown shade. Also colour the neck with brown.
Step 7- Colour the face
Now it’s time to colour the face of the turtle and give it a natural look. Colour the face of the turtle with orange colour. Colour the front of the mouth with yellow shade. The blend of orange and yellow will give a perfect look to the mouth. Now make the eyes and two holes of nose of turtle with black colour.
The shell of turtles is green and dark. To make it look natural, we will use brown and orange colours and colour the top of the ball. Also colour the inner area of the ball with orange and yellow shades.
Step 8- Fill and decorate your lucky turtle craft
Once the entire turtle is ready and the paint gets dry, fill the ball with shells, artificial grass, flowers and make it look exceptional. Some people also pour water and fill the shell of the turtle with money, grass, shells and much more!
Here is your amazing diy lucky turtle charm ready! You can use it as a decorative element for your home and give your home a natural feel. Make the turtle, pour water in it, use the leaves, flowers and shells to decorate it and your beautiful turtle art will simply amaze your guests!
Prepare this beautiful turtle craft and make your tabletop more colourful, decorative and artistic!


