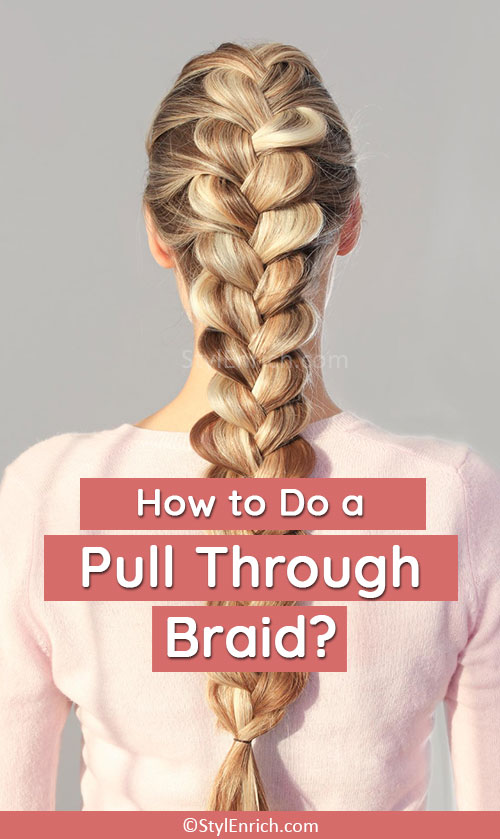
Why Should You Try Pull Through Braid?
Looking for a stylish and practical hairstyle? Look no further than the pull through braid! This chic and versatile style offers a range of benefits, from its easy-to-achieve look to its ability to keep your hair out of your face all day long. One of the biggest advantages of the pull through braid is how simple it is to create. Unlike some other intricate braids, the pull through braid can be achieved with just a few simple steps. This makes it a great option for anyone who wants a stylish look without having to spend hours in front of the mirror.
The pull through braid hairstyle is getting popular these days among young and college going girls.
Another major benefit of the pull through braid is its versatility. Whether you’re looking for a casual, everyday look or a more formal style for a special occasion, the pull through braid can be adapted to suit your needs. You can customize the size and shape of your braids, as well as the placement of your braid, to create a look that’s uniquely your own.
Of course, one of the most practical benefits of the pull through braid is its ability to keep your hair out of your face. If you’re tired of constantly pushing your hair out of your eyes or dealing with strands that won’t stay put, the pull through braid is the perfect solution. By pulling your hair back into a tidy braid, you can keep it out of your face and off your neck all day long.
How To Make Pull Through Braid Hairstyle Step By Step?
Things You Need to Make Pull Through Braid
– A Rattail comb
– Strong-hold hairspray
– Elastic bands
– Hair sectioning clips
Instructions –
- To begin, gather a section of hair from the top of the head and secure it with an elastic band at the crown. This will create a stable foundation for your hairstyle and make it easier to work with.
- Next, clip this ponytail out of the way. It might be helpful to secure your hair away from your face.
- To create a new section, gather a strand of hair from above your ears and secure it with a second elastic.
- To create a chic and effortless hairstyle, begin by letting down your first ponytail and dividing it into two equal sections. Next, bring the second ponytail up through the middle of the two sections, and clip it out of the way.
- To continue, gather a fresh section of hair and merge it with the previous two sections from the first ponytail. Secure the combined hair with an elastic band to keep it in place.
- Let your top ponytail down. Then, divide your hair into two sections and bring the bottom ponytail through the middle, securing it with a clip.
- Create a new section of hair and carefully gather it along with the two sections from the top ponytail. Secure the three sections together with an elastic band to achieve a seamless look.
- To create a more intricate braid, once all of the hair is brought into the initial braid, keep dividing the top ponytail into smaller sections, wrapping them around the bottom ponytail, and securing them with an elastic. This will result in a stunning braid with multiple layers and added texture.
- Now go back over each section, pulling on the sections making the braid fuller.
- Achieve sleek and polished locks by taming any unruly flyaways with a high-quality firm-hold hairspray.
Whether you’re looking for a quick and easy hairstyle or a stylish look for a special occasion, the pull through braid is a great choice. With its simple yet versatile design, this braid offers a range of benefits that make it a favorite among women of all ages and hair types.
If you try this hairstyle then do share your experience with us.
Thank you!
Related Posts


I think The pull-through braid is a stylish and practical hairstyle with easy creation, versatility, and hair removal benefits. It offers customization for casual and formal looks, and is suitable for various occasions and hair types. Overall thank you for share this article.