Hi, all you glamorous girls! Today we will be talking about the popular technique of defining your facial features. Highlighting and Contouring! Especially if you are a beginner, contouring for beginners is a technique worth learning. Contouring is a great technique to sculpt the face, define your bone structure more prominently. Highlighting act as a technique to make your face supple and lifted and make it appear more defined and youthful. Once you learn these two techniques, you will find how smartly you can define your facial features without changing your features instead.
One of the best examples for highlighting and face contouring is Kim Kardashian. She is famous for having the face highlighted and contoured by her personal makeup artists in different ways. A question that most of the young girls ask for Contouring for beginners. It is quite an easy process than what many people think it is. It’s simply a matter known for where to place, right tools and blending. Let us read on to learn face contouring for beginners through this step by step guide to achieve the flawless definition.

- For attaining a natural look that you can carry every day, try 1-2 shades darker/lighter than your natural tone. Always use matte products for the natural look.
- For dramatic or glamorous look, go almost 3-4 shades lighter/darker.
- Always remember the place or the lighting you will be going to.
- Keep in mind that in the daylight your face will show more and you don’t want to sculpt the cheekbones just for a day out at the park.
- Powder or cream, you can use either one as per your personal preference. Perhaps if you play around with both, see which one works for you.
Tools Required for Contouring
1. Cream
a. Cream Contour and Cream Highlight
For your cream contour you may use different shades of concealer or foundation. Nowadays markets are flooded with products like contour pencils, cream colour palettes- perfect for narrow spots like the nose, chin etc.
Learn here How to Contour Your Nose Step by Step!
b. Contour Brush
While applying contour creams, you can use your fingers as it gives a completely natural effect. However, while blending use a round brush with dense bristles.
c. Makeup Sponge
Beauty Blender sponge is perfect for blending the highlight and contour flawlessly. After using the brush, touch up by stippling damp sponge to wipe off any visible lines.
2. Powder
a. Powder Contour and Highlight
Go for light colour palette which can blend easily. You can get a bronze in 2-3 shades.
b. Angled Brush for Contouring
Large angled brush is ideal for spreading your powder with contour shade. There are many affordable versions in the market based on the quality and low price deals.
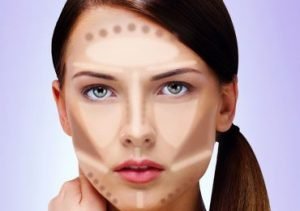
Steps for Face Contouring for Beginners
- Start by applying foundation all over you face and then apply concealer in the normal shade.

- Now time for darker contour shade. Make a fishy face by sucking your cheeks to see the hollows. Make a 3; starting from the middle of your hairline trace 3 alongside the face. It should end underneath the jawline.

- Repeat this steps on the other sideband run the shade down the sides of the nose for more slimming effect.
- Blend the concealer and make sure you keep the darker shade in place. Placement is very important while contouring the face structure because that is how the illusion of jawlines and sharp cheekbones are created.

- Apply the lighter shade to the highlighted spots such as brow bone, the centre of the forehead, down the centre of the nose, apples of cheeks, under the cheekbones and cupids’ chin and bow. Just think where the light would hit on your face.

- Using your make-up brush, blend, blend and blend. Brush gently to blend the contour shade to your highlight. Make it as effortless as you can. If not able to get it right, no worries, you can always get back to using a sponge.

- If you are using cream, go over the look with a damp makeup sponge and using a stippling motion make sure it’s not in excess. For the ones who use powder, use the angled fluffy contour brush to get rid of harsh lines if visible.
- Use your favourite blush with add of pop colour to your cheekbones. Softer colours look more natural and complement the contouring as well. Colours like peach and light pink are perfect.

- If your skin is oily and you have used the cream products, set your makeup by dusting little light translucent powder. You can also use bronzer or powder palette and it will keep your makeup in place throughout the day and night as well.
Don’t of Makeup Contouring
- Don’t use the circular motion while applying bronzer to your cheeks as this can lead to the appearance of dark circles your upper area of cheeks.
- Gently sweep the contour brush in back & forth motion.

- Keep away from your eyes else it will give the illusion of small eyes.
- Don’t apply too many products like concealer, foundation or powder because you do not want it to look too thick.

- Don’t go overboard with your contour to a point where you find the definite lines between the shades. Remember what you see on the online videos tutorials for “how to contour your face” is not what you have to try every time.You must practice enough to perfect the art of contouring.

- Don’t mix powders and creams. You can use one of the product. The cream is good for dry skin. The powder is best for the oily skin.

- Don’t forget to apply blush on your cheeks! Without some colour pop, your nicely contoured face will end up looking flat. Sweep colour across the cheeks for a flushed look.

We bring here How to Apply Makeup to Small Eyes. Read more…
Well, there you go! The beauty guides to contouring for beginners. These are some of the initial tips to start comfortably with highlighting and contouring.These techniques can enhance your amazing features, but ensure that you do it correctly. Highlighting and contouring the face isn’t difficult at all, all it takes is the bit of patience and technique to get right.
Related Posts